

Decipher
This guide provides step-by-step instructions on how to integrate Voiceform widgets into Forsta Decipher surveys, enabling voice recording, AI-driven questions, and enhanced respondent data tracking.
How to Integrate Voiceform Widgets in Decipher
Enhance your Forsta Decipher surveys by embedding Voiceform widgets, enabling powerful voice recording and AI-driven follow-up features. Follow these steps to seamlessly integrate Voiceform questions into your Decipher survey.
Step 1: Log In to Your Accounts
Log in to both your Decipher and Voiceform accounts. If you don’t have a Voiceform account yet, you can create one by visiting the Voiceform website.
Step 2: Create Your Survey in Voiceform
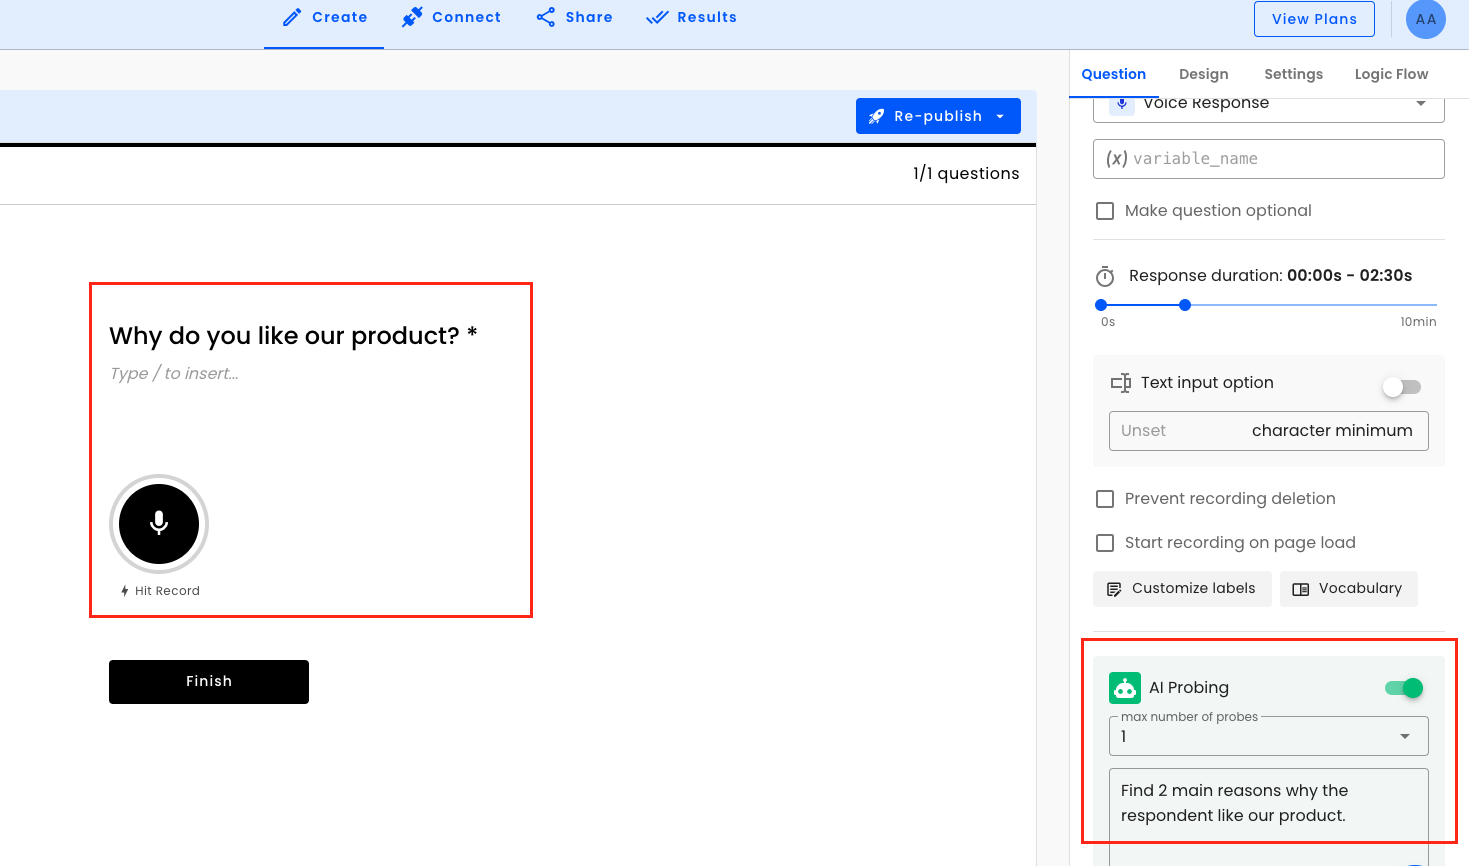
In the Voiceform platform, create a new survey and add your desired questions. For example, you can include a voice response question such as, “Why do you like our product?” and enable AI Probing with a goal like “Find 2 main reasons why the respondent like our product.” Once your survey setup is complete, publish it.
Step 3: Add the Voiceform JavaScript Library to Decipher
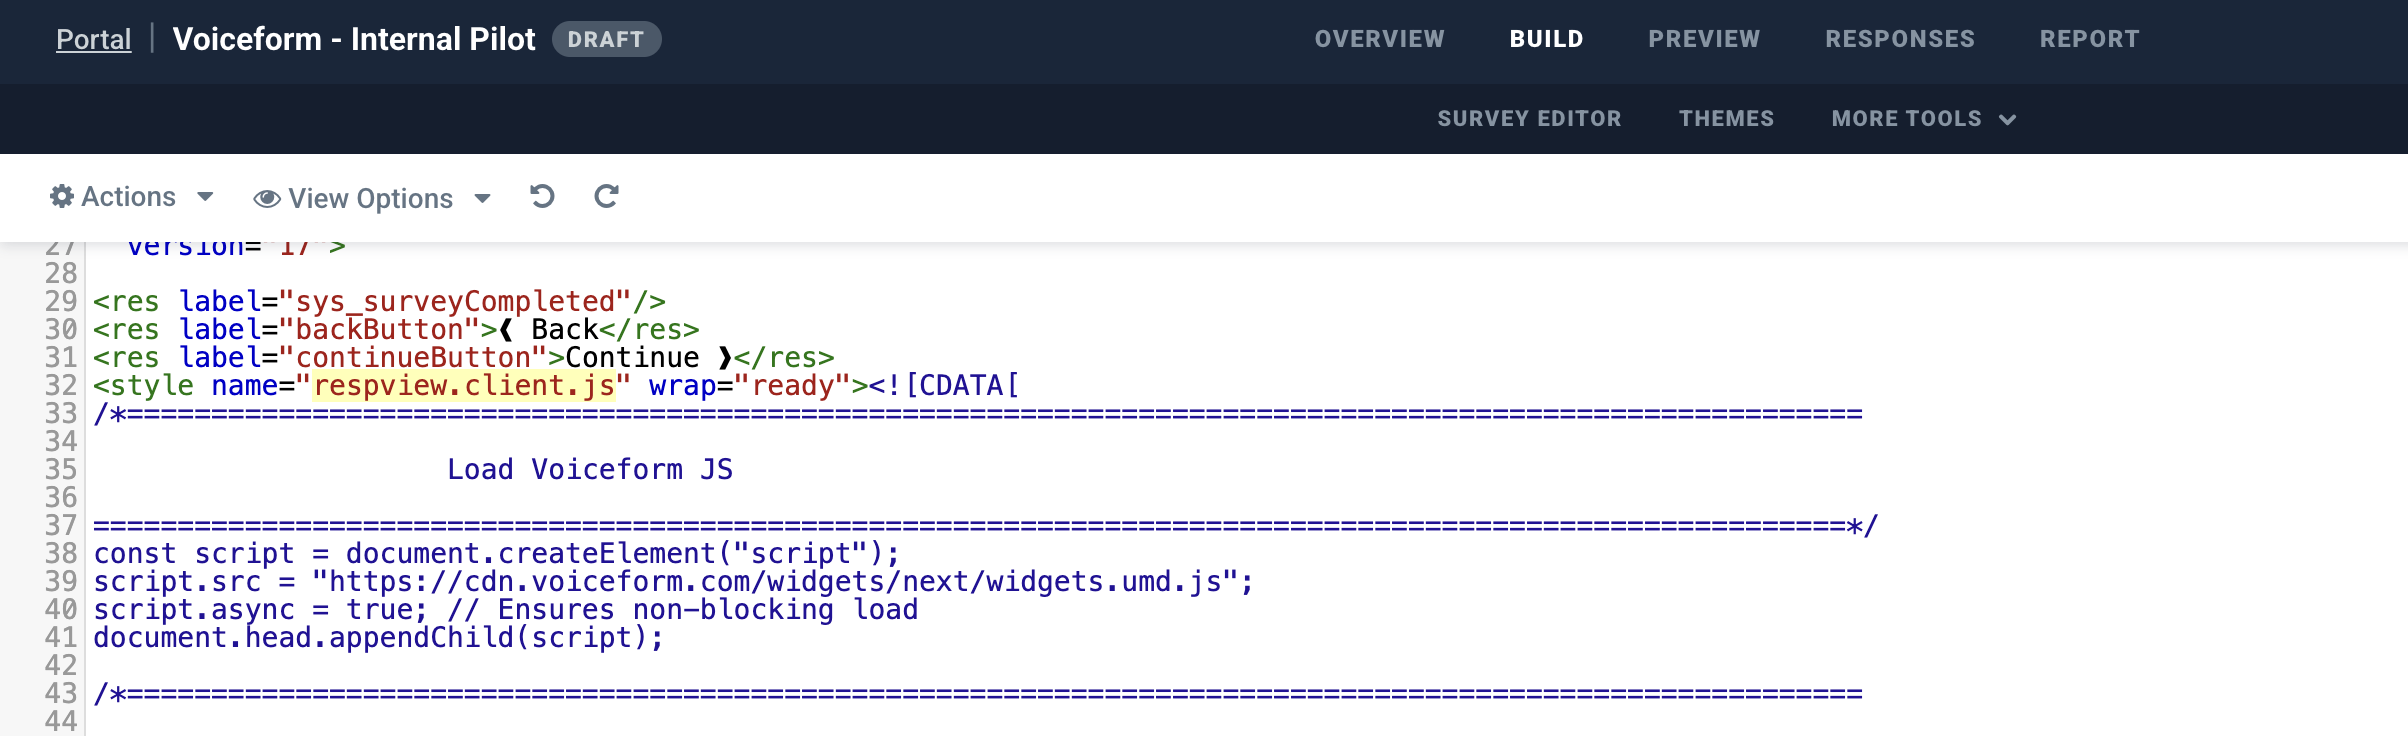
In your Decipher survey project, open the Survey Build and go to More Tools → Edit XML. Inside the XML editor, locate the last style attribute named respview.client.js and insert the following code into it. For detailed instructions on adding JavaScript to Decipher surveys, refer to this documentation: Including JavaScript in a Survey.
<style name="respview.client.js" wrap="ready"><![CDATA[
/*====================================================
                     Load Voiceform JS
====================================================*/

const script = document.createElement("script");
script.src = "https://cdn.voiceform.com/widgets/next/widgets.umd.js";
script.async = true; // Ensures non-blocking load
document.head.appendChild(script);

// PREVIOUS CODE SHOULD STAY HERE
// ...
// ...
]]></style>
<style name="respview.client.js" mode="after"> <![CDATA[
<script src="https://cdn.voiceform.com/widgets/next/widgets.umd.js"></script>
<!-- PREVIOUS CODE SHOULD STAY HERE -->
]]></style>This step ensures that the Voiceform widgets will function properly within your Decipher survey.
Step 4: Embed the Voiceform Question in Decipher
Retrieve the Voiceform Widget Code
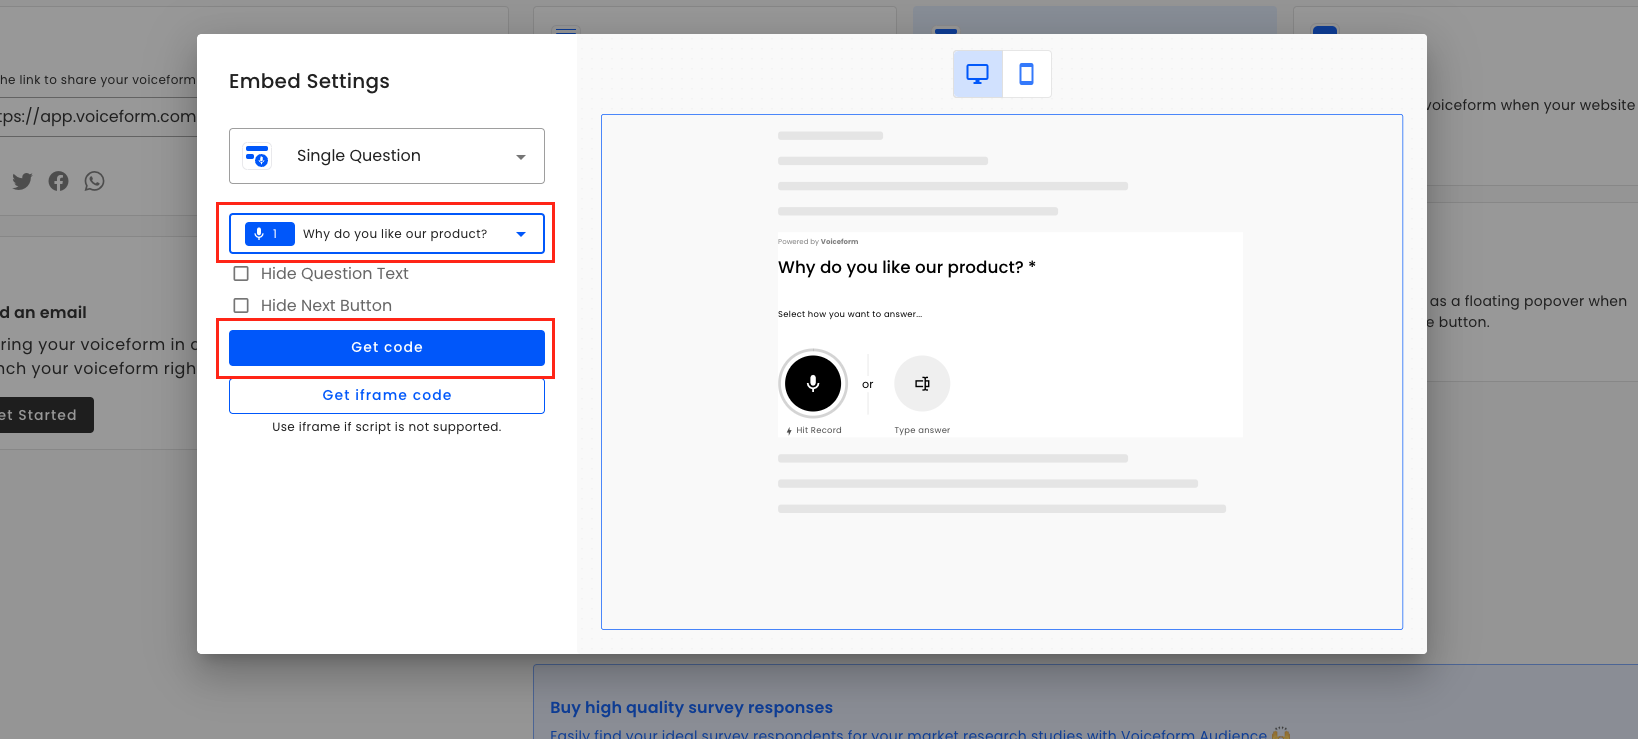
- In Voiceform, navigate to the Share tab.
- Select the "Single Question" widget option.
- Choose the question you created from the dropdown menu.
- Optionally, you can decide whether to hide the question or the "Next" button, but we'll leave them visible for now.
- Click the "Get Code" button and copy only the snippet under
<!-- Insert the Voiceform widget code within the <body> of your HTML document -->.
Insert the Widget Code in Decipher via XML Editor (Recommended)
- Open the Survey Builder in Decipher and locate the question where you want to embed the Voiceform widget.
- Switch to the XML Editor view.
- Identify the position where you want to add the next question.
Example using the <html> tag:
<html label="vf_question_1" where="survey"><![CDATA[
    <vf-widget
        data-mode="single-question"
        data-question-id="YOUR_VOICEFORM_QUESTION_ID"
        data-hash="YOUR_VOICEFORM_SURVEY_HASH"
        data-response-id="${uuid}"
        data-record="${record}"
    ></vf-widget>
]]></html>
<suspend/>
<html label="vf_question_1" where="survey"><![CDATA[
<vf-widget
data-mode="single-question"
data-question-id="YOUR_VOICEFORM_QUESTION_ID"
data-hash="YOUR_VOICEFORM_SURVEY_HASH"
data-response-id="${uuid}"
data-record="${record}"
></vf-widget>
]]></html>
<suspend/>
<radio label="accepted">
<title>Do you accept our terms?</title>
<row label="r1">Yes, I am accepting.</row>
<row label="r2">No, I am not accepting.</row>
</radio>
<suspend/>
<html label="vf_question_2" where="survey"><![CDATA[
<vf-widget
data-mode="single-question"
data-question-id="YOUR_VOICEFORM_QUESTION_ID"
data-hash="YOUR_VOICEFORM_SURVEY_HASH"
data-response-id="${uuid}"
data-record="${record}"
data-accepted="[pipe: accepted]"
></vf-widget>
]]></html>
<suspend/>This code integrates the Voiceform widget directly into your survey, enabling voice recording and response capture.
(Alternative) Insert Voiceform Question Widget via UI
-
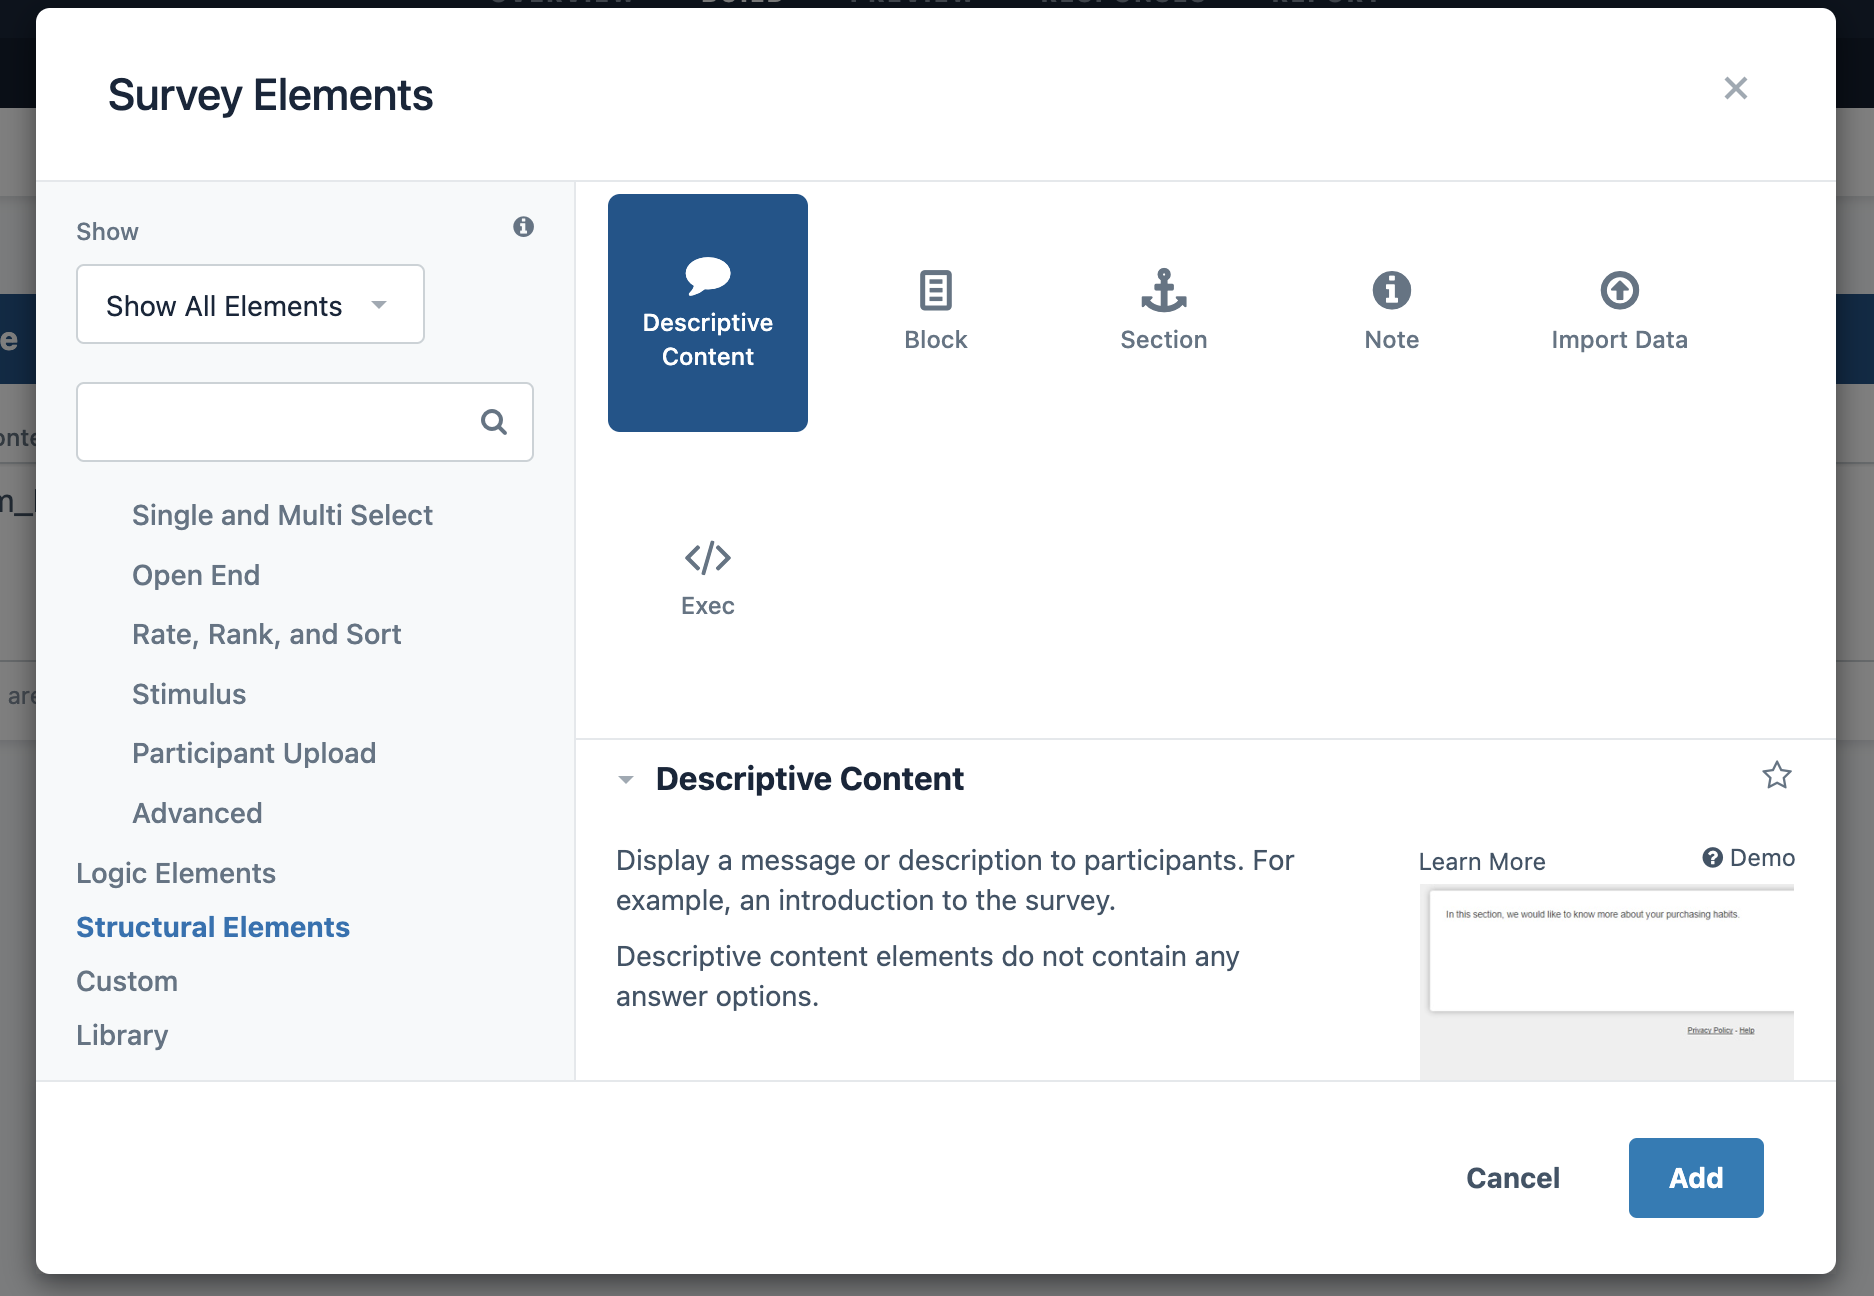
Open the Survey Editor and click the "+ Element" button in the bottom-left corner to add a new question.

-
Select "Descriptive Content" as the element type.
-
Rename the element to something meaningful, such as
vf_question_1.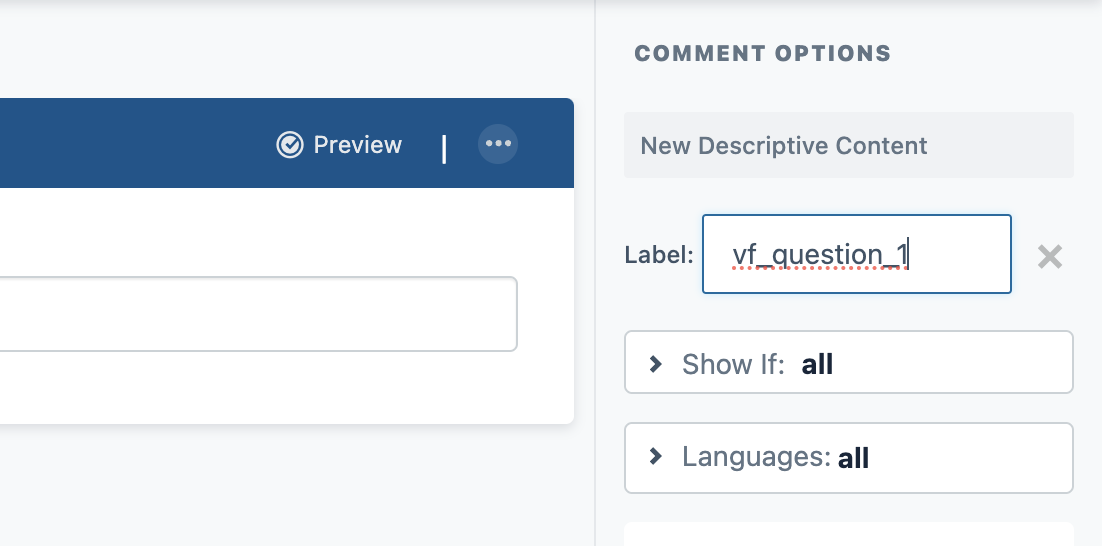
-
Open the Source Code of the element.
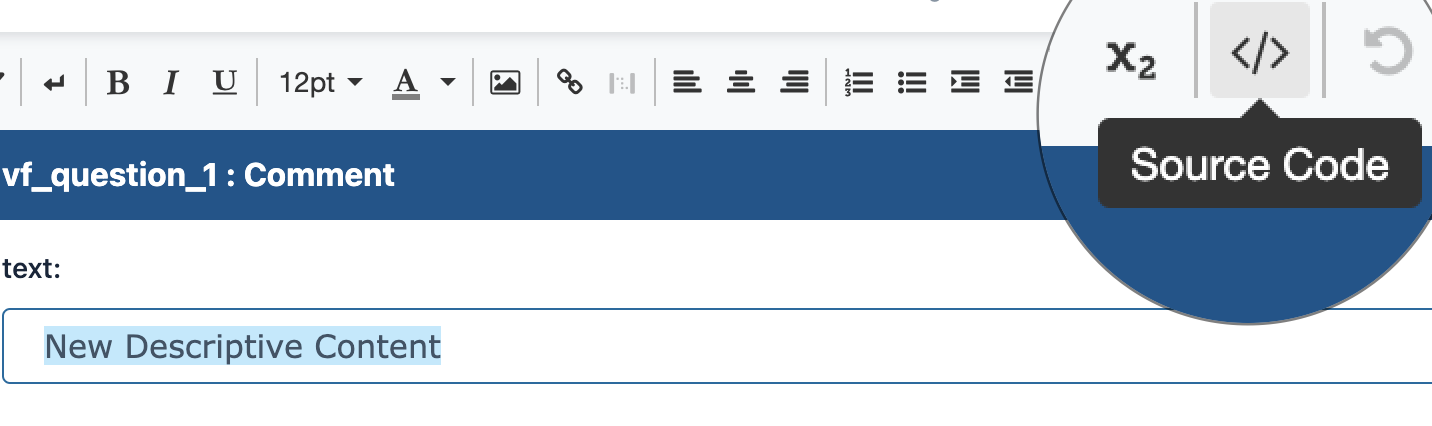
-
Insert the Voiceform widget code.
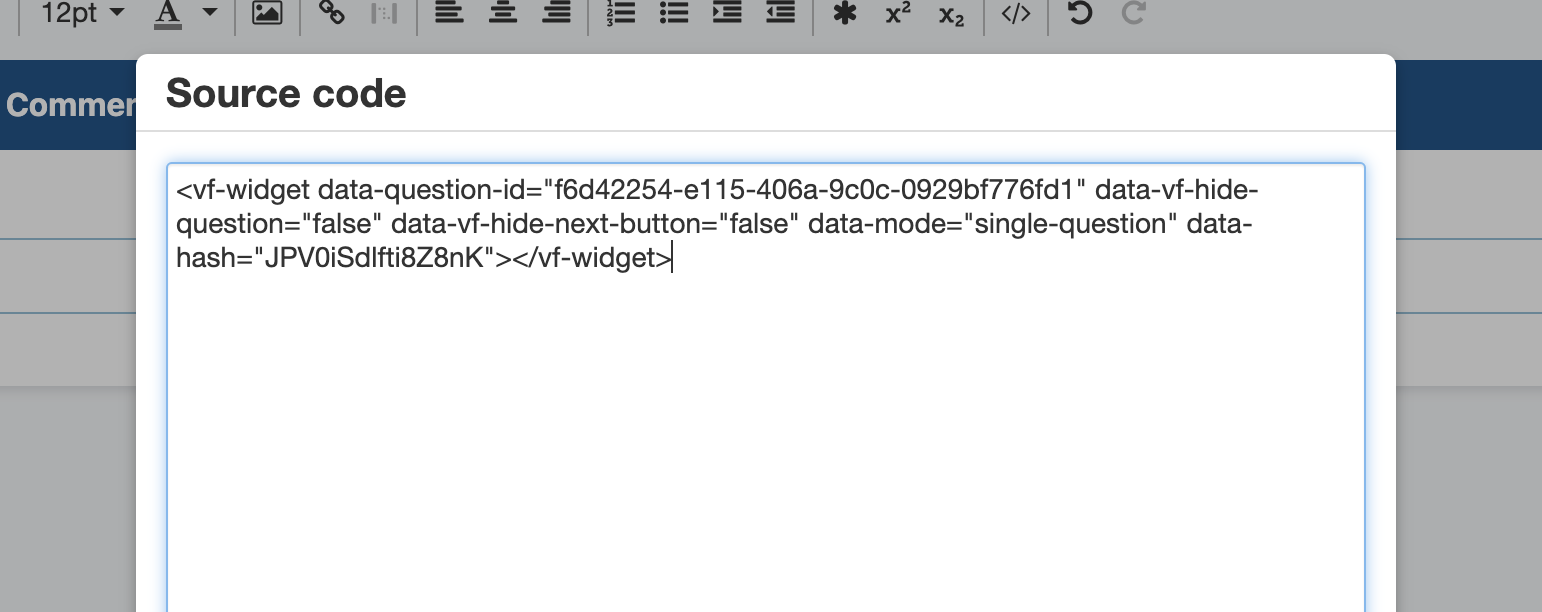
-
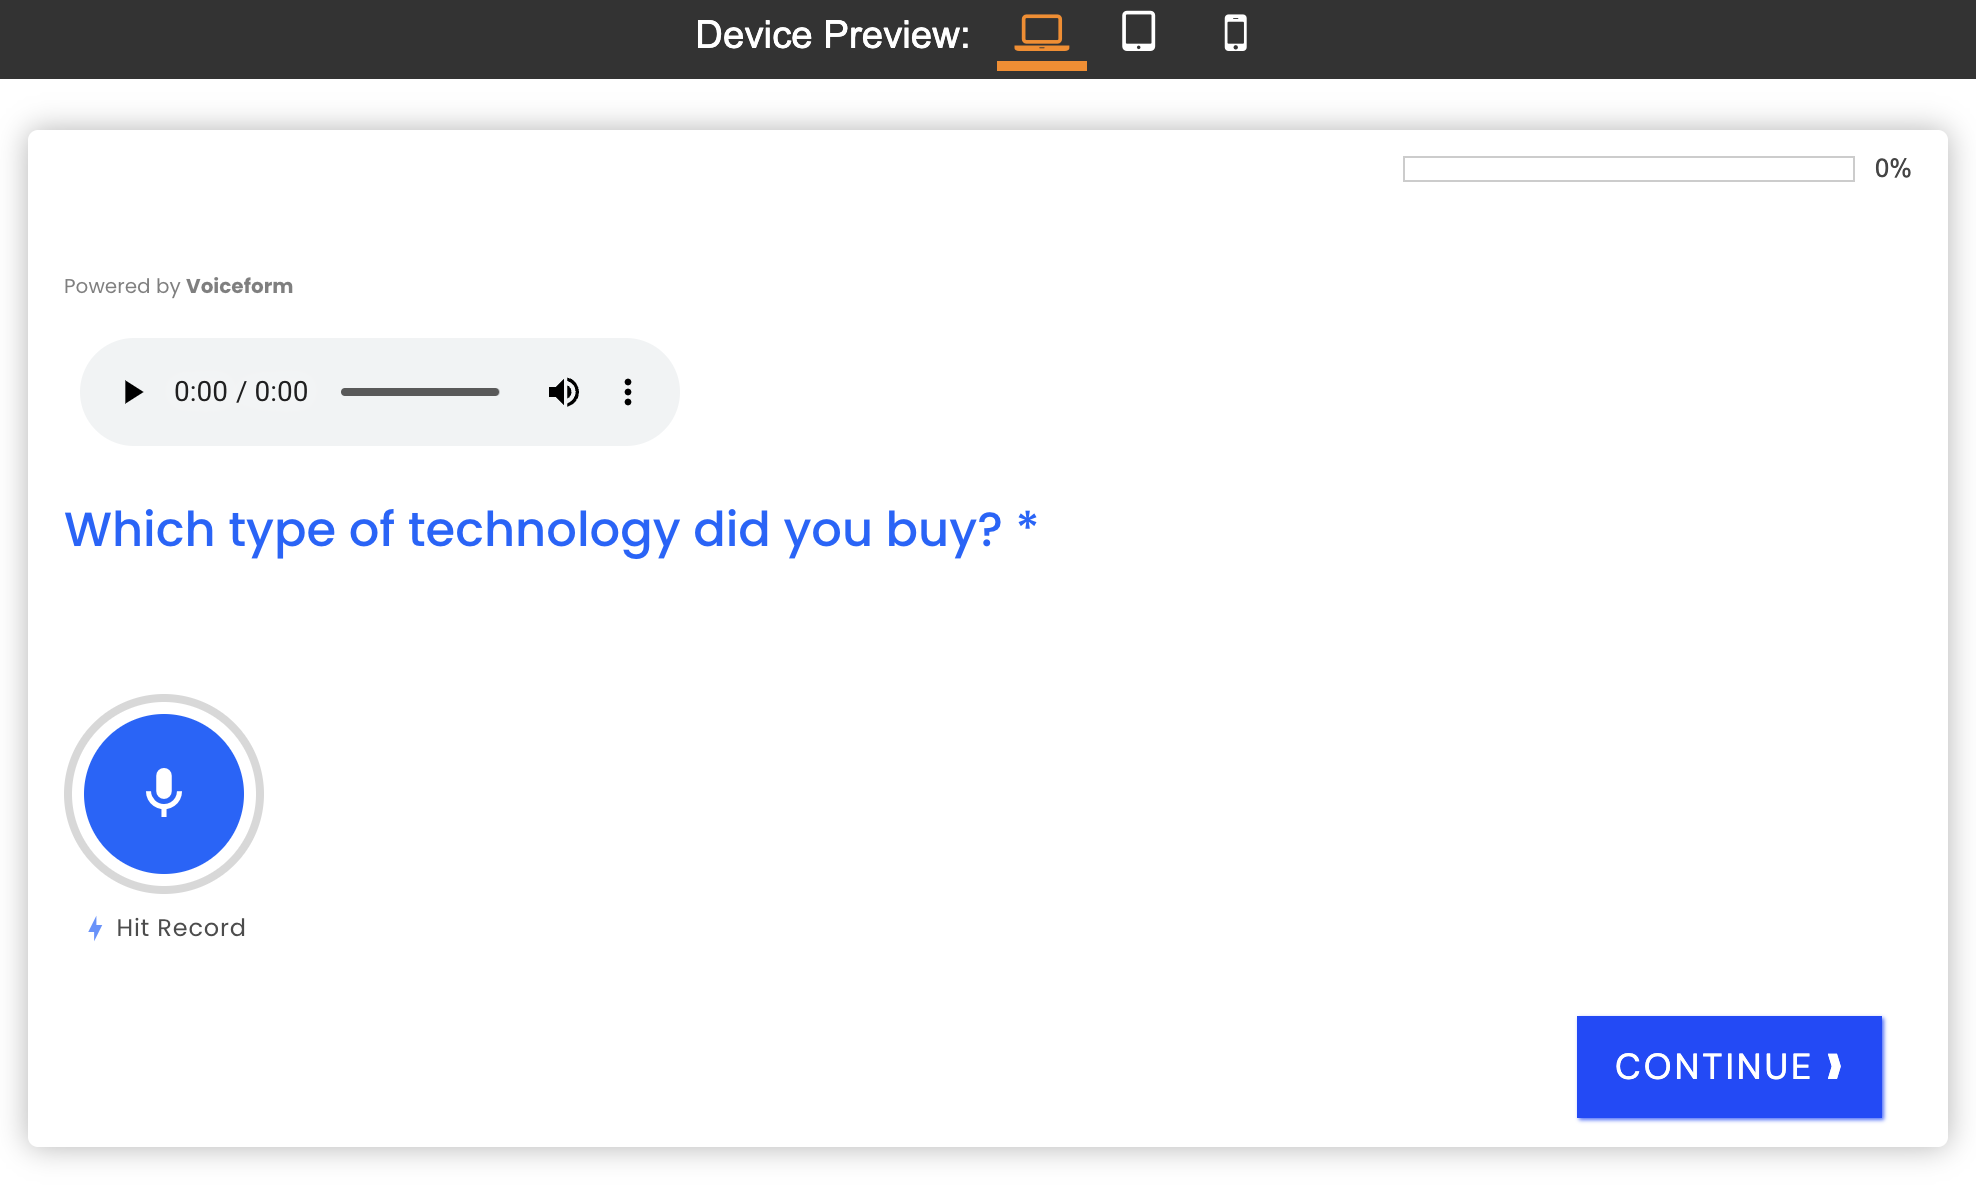
Save your changes. The widget should now be visible in the element preview.
Track Panel & Respondent IDs
To capture respondent data such as Panel or Respondent IDs within Decipher, you can pass these as parameters within the Voiceform widget code. These IDs can be dynamically populated using Decipher’s variables. By default we pass respid but you may pass your own unique identifier.
Example using the <html> tag:
<html label="vf_question_1" where="survey"><![CDATA[
    <vf-widget
        data-mode="single-question"
        data-question-id="YOUR_VOICEFORM_QUESTION_ID"
        data-hash="YOUR_VOICEFORM_SURVEY_HASH"
        <!-- RESPONSE ID TRACKING -->
        data-response-id="${uuid}"
  			...
    ></vf-widget>
]]></html>
<suspend/>
About Response IdThe
data-response-idorresponse_idattribute in your metadata is a special identifier used by our system to map answers to a single response. Please ensure that this value is unique and used correctly according to your business logic.Note: At this time, providing a response ID does not prevent multiple submissions if a single-question widget is used. Each submission will still be treated as a separate entry.
Pass Decipher Data Into Voiceform
Integrating data from Decipher into Voiceform enhances the survey experience by personalizing content and ensuring seamless data flow. Utilizing Decipher's Python variables and variable piping, you can transmit various data types to the Voiceform widget, including pre-declared variables and responses from previous questions. For comprehensive guidance, refer to Decipher's piping documentation and Voiceform's embedding instructions.
...
<!-- Declare Custom Variables -->
<exec>
  customerName = "Alex";
  customerAge = 45;
</exec>

<!-- Previous Questions -->
<radio label="accepted">
  <title>Do you accept our terms?</title>
  <row label="r1">Yes, I accept.</row>
  <row label="r2">No, I do not accept.</row>
</radio>

<radio label="color">
  <title>What's your favorite color?</title>
  <row label="r1">Pink</row>
  <row label="r2">Green</row>
  <row label="r3">Orange</row>
  <row label="r4">Blue</row>
</radio>


<!-- Embed Voiceform Widget -->
<html label="vf_question_1" where="survey"><![CDATA[
<vf-widget
        data-mode="single-question"
        data-question-id="YOUR_VOICEFORM_QUESTION_ID"
        data-hash="YOUR_VOICEFORM_SURVEY_HASH"

        <!-- UNIQUE RESPONSE ID TRACKING -->
        data-response-id="${respid}"

  			<!-- PASSING DEFAULT METADATA VARIABLES https://forstasurveys.zendesk.com/hc/en-us/articles/4409477220123-Default-Meta-Variables -->
				data-record="${record}"
        data-date="${date}"
        data-ipAddress="${ipAddress}"

				<!-- PASSING CUSTOM VARIABLES -->
				data-customerName="${customerName}"
				data-customerAge="${customerAge}"

				<!-- PASSING QUESTION ANSWERS -->
				data-accepted="[pipe: accepted]"
				data-color="[pipe: color]"

    ></vf-widget>
 ]]></html>
<suspend/>
...
<!-- Declare Custom Variables -->
<exec>
customerName = "Alex";
customerAge = 45;
</exec>
<!-- Previous Questions -->
<radio label="accepted">
<title>Do you accept our terms?</title>
<row label="r1">Yes, I accept.</row>
<row label="r2">No, I do not accept.</row>
</radio>
<radio label="color">
<title>What's your favorite color?</title>
<row label="r1">Pink</row>
<row label="r2">Green</row>
<row label="r3">Orange</row>
<row label="r4">Blue</row>
</radio>
<!-- Embed Voiceform Widget -->
<html label="vf_question_1" where="survey"><![CDATA[
<vf-widget
data-mode="single-question"
data-question-id="YOUR_VOICEFORM_QUESTION_ID"
data-hash="YOUR_VOICEFORM_SURVEY_HASH"
data-metadata='{"responseId":"${respid}", "record":"${record}", "date":"${date}", "ipAddress": "${ipAddress}", "customerName": "${customerName}", "customerAge": "${customerAge}", "accepted": "[pipe: accepted]", "color": "[pipe: color]"}'
></vf-widget>
]]></html>The data passed through the data- attributes will be included in the submission metadata within Voiceform. This integration allows you to track and analyze responses alongside the associated Decipher data.
Supporting Required Questions
When the Voiceform widget is embedded into a Decipher element, it does not have any connection with the Decipher "Continue" button. This means that, even if the question is marked as required, respondents can still skip it.
To address this, we provide a solution: for questions where the <vf-widget /> is embedded, the Decipher "Continue" button is hidden, and Voiceform takes control of navigation. The respondent can proceed to the next question only after submitting their answer.
1. Locate the Previously Added HTML Element
Find the <html> element containing the <vf-widget /> that you want to make required.
2. Insert the Following Script
Add this script immediately after the </vf-widget> tag to ensure the respondent cannot proceed without submitting an answer.
<script>
			$(document).ready(function () {
        // Hide the continue button initially
        $("#btn_continue").hide();

        // Listen for messages from the embedded Voiceform
        window.addEventListener("message", function (event) {
          // Validate the origin to ensure security
          if (event.origin !== "https://app.voiceform.com") {
            return;
          }

          // Check if the message indicates a form submission
          if (event.data && event.data.type === "voiceform.form-submitted") {
            // Show the continue button and trigger a click
            $("#btn_continue").show().click();
          }
        });
      });
</script>
...
<!-- Declare Custom Variables -->
<exec>
customerName = "Alex";
customerAge = 45;
</exec>
<!-- Previous Questions -->
<radio label="accepted">
<title>Do you accept our terms?</title>
<row label="r1">Yes, I accept.</row>
<row label="r2">No, I do not accept.</row>
</radio>
<radio label="color">
<title>What's your favorite color?</title>
<row label="r1">Pink</row>
<row label="r2">Green</row>
<row label="r3">Orange</row>
<row label="r4">Blue</row>
</radio>
<!-- Embed Voiceform Widget -->
<html label="vf_question_1" where="survey"><![CDATA[
<vf-widget
data-mode="single-question"
data-question-id="YOUR_VOICEFORM_QUESTION_ID"
data-hash="YOUR_VOICEFORM_SURVEY_HASH"
data-metadata='{"responseId":"${respid}", "record":"${record}", "date":"${date}", "ipAddress": "${ipAddress}", "customerName": "${customerName}", "customerAge": "${customerAge}", "accepted": "[pipe: accepted]", "color": "[pipe: color]"}'
></vf-widget>
<script>
$(document).ready(function () {
// Hide the continue button initially
$("#btn_continue").hide();
// Listen for messages from the embedded Voiceform
window.addEventListener("message", function (event) {
// Validate the origin to ensure security
if (event.origin !== "https://app.voiceform.com") {
return;
}
// Check if the message indicates a form submission
if (event.data && event.data.type === "voiceform.form-submitted") {
// Show the continue button and trigger a click
$("#btn_continue").show().click();
}
});
});
</script>
]]></html>Step 5: Save and Test Your Survey
Once you’ve embedded and customized the Voiceform widget, save your survey. It’s essential to thoroughly test the survey to ensure that the Voiceform question integrates and functions as expected within your Decipher project.
Updated about 1 year ago